This is the tutorial on the Rolling Calendar Control that I
published and that you can download from
here
A "friend" told me that this Calendar Control is like a bomb rolling
watchmaking. Seeing this image you may be right:
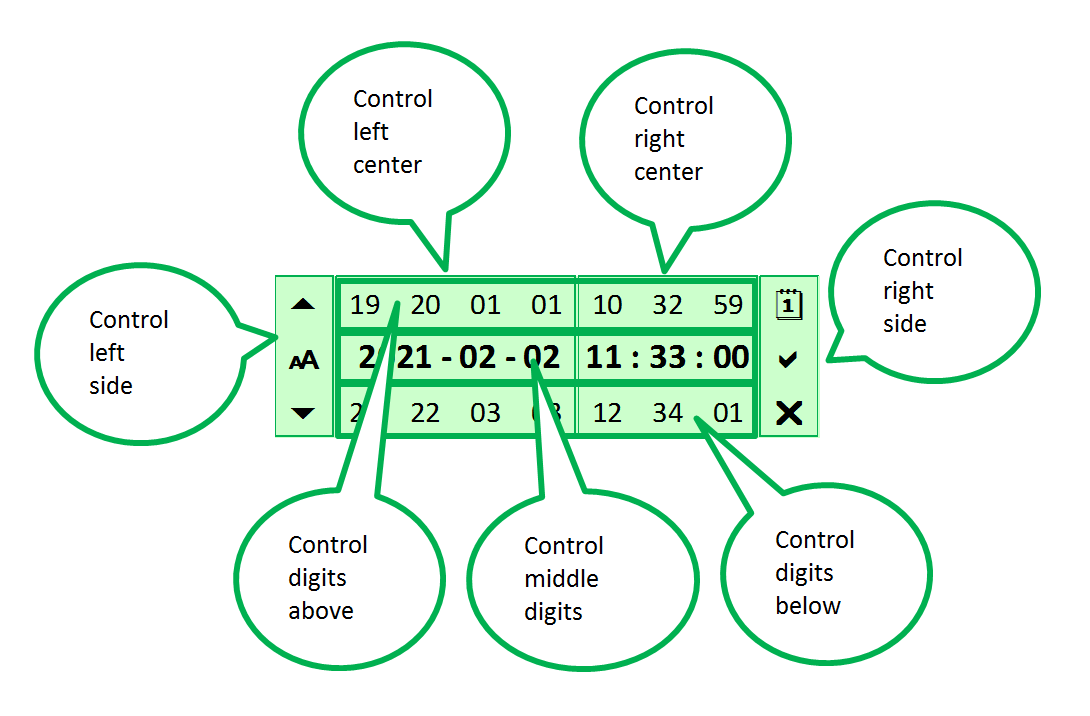
It consists of 7 control groups:
Left side: with 3 buttons to change the control zoom.
Left center: to change the date.
Right center: to change the time.
Right side: with 3 buttons to set the current date and time; for accept
changes and to undo changes.
Digits above: to lower the middle pairs of digits.
Digits below: to raise the middle pairs of digits.
Middle digits: clicking on the middle digits toggles between the dates
and its format.
These controls can be better placed in this image:
Each pair of digits in the central controls has a pair of digits with
the lower value and below another pair of digits with the higher value.
By clicking on one of the pairs of digits in the rows upper or lower
respectively decreases or increases the torque value of central digits.
BONUS:
By placing the cursor on a pair of central digits and moving it to the
row higher or lower continuously decreases or increases the value of the
associated pairs, as if turning the wheel of that pair of digits, so I
have called this "Rolling" Calendar Control.
The three buttons on the left allow you to change the zoom of the control:
Top button: zooms 10% to a maximum of 160%,
Center button: zooms to 100%.
Bottom button: zooms out 10% to a minimum of 80%.
The three buttons on the right are used to:
Top button: put the current date and time and update it every second.
Central button: accept the selected date and time, putting its value in the
active cell.
Bottom button: undo changes and put the value back in control active
cell.
If the sheet is protected and the selected cell is also protected, The
Control will be displayed, but when trying to change the value of the cell
active, it will not allow to change its value, giving the following
warning:
"The active cell cannot be updated because it is protected."
Clicking with the right mouse button on the side control left, you enter
several menu options:
We have already discussed the first option that allows you to zoom in on the
control with the increase and decrease buttons.
This option indicates the type of date displayed and can be changed with the
increase and decrease buttons. The number format of the active cell it is
not modified in any case. The possible date types are:
*0 or *1 or *2: Those beginning with an asterisk character (*)
indicate which is the regional date format by default, with the
separator by system default, so it can be both the "-" character and
the "/" character. Its number indicates the same as for the 3 types
following.
0 = mm/dd/yyyy being its order: month/day/year
1 = dd-mm-yyyy being its order: day-month-year
2 = yyyy-mm-dd being its order: year-month-day
The time format is always the same: hh:mm:ss being its order: hours
minutes seconds
This option indicates the rotation speed of the digit pairs change. It can
be modified with the increase and decrease buttons. A value
s0
makes the Control non-rolling. s8 is the default speed.
With the values s1 (very slow) to s9 (very fast) the
Control is rolling when the mouse cursor is passed from the digits in
the middle to the digits above or below.
This option indicates the type of text font for the control. It can be modified with the increase and decrease buttons. There are 6 fonts:
f1 - Calibri
f2 - MS Sans Serif
f3 - Palatino Linotype
f4 - Tahoma
f5 - Times New Roman
f6 - Verdana
This option allows you to change the color of the control with the increase and decrease buttons, as can be seen in the following image.
Clicking with the right mouse button on the right side control, you enter
other menu options:
With this option you access with the browser to the blog post: Rolling
Calendar Control.
This option shows the hidden sheet 'ControlCal' that controls all
actions of this Control.
With this option you access the Copyright page.
This Calendar Control is displayed if the format of the cells is a type of
number with date and/or time format.
Examples of cell formats with date and / or time number type:
Formats that display the date and time:
mm/dd/yyyy hh:mm:ss
mm/dd/yyyy hh:mm
d mm aa h:m
Formats that display the date:
mm/dd/yyyy
dd-mmm-yy
mmm-yy
Formats that display the time:
[$-F400]h:mm:ss AM/PM
hh:mm
hh:mm:ss
Formats that are not displayed, such as elapsed times:
[h]
[m]
If the cell is empty and has a date and/or time format, the control
displays the current date and/or time.
If the cell contains an incorrect date, it reports the error, for example
the dates of January and February 1900, which Excel does not calculate
well for consider that leap year wrongly:
"Incorrect date due to being < 1900-03-01"
In the following video, in Spanish, you can see the new Rolling Calendar Control in action,
although most of the explanations in this tutorial are not included in the
video, since it is made with the first version of the Control:
Could comment on anything that is not clear or could be improved.
If you are looking for a more conventional Calendar Control, go to the one
I published
here.
No Response to "Rolling Calendar Control Tutorial"
Leave A Reply
Comenta este artículo, critícalo o avisa si detectas algún error que haya que corregir.
py_RC Design with 3D Cache
-
Following my recent post on passing 3D arrays from Python to Excel I have
now added a py_UmomC function to the py_RC Design spreadsheet. The new
spreadshee...
Copilot en Excel y las skills personalizadas
-
Agent Mode permite a Copilot en Excel y las skills trabajar de forma
autónoma dentro de Excel a partir de un prompt, mientras el tu vas
supervisando y aj...
Números de pastel
-
Estos números constituyen una extensión natural de los traducidos como
“Catering perezoso” (o también como “Cortador perezoso”), que ya se han
estudiado ...
PA4 - Grados de parentesco familiar
-
🔝*To translate this blog post to your language, select it in the top left
Google box. *
Índice automático desplegable
Mis grados de parentesco...
Build a Daily Events Calendar in Excel
-
Use my Excel events calendar to track meetings and events inside a
workbook. Add your upcoming events to a list, set a start date, and then
see those items...
Cómo hacer gráficos en Excel
-
Excel es una de las herramientas más potentes y versátiles para el análisis
y la presentación de datos. Los gráficos en Excel no solo ayudan a
visualizar...
Análisis DAFO (FODA, DOFA) las decisiones con Excel
-
Para conocer la situación de una empresa, proyecto o persona, recurrimos al
análisis DAFO (FODA, DOFA) en la toma de decisiones con Excel. El los años
sese...
How To Predict Bearing Life With Excel
-
When you work in mechanical engineering, understanding the reliability and
performance of bearings under various conditions is crucial. Bearings are
the co...
TikTok’s search evolution
-
2 in 5 Americans use TikTok as a search engine. Nearly 1 in 10 Gen Zers are
more likely to rely on TikTok than Google as a search engine. More than
half of...
Unblocking and Enabling Macros
-
When Windows detects that a file has come from a computer other than the
one you're using, it marks the file as coming from the web, and blocks the
file....
La importancia de saber mecanografía en 2022
-
[image: Resultado de imagen de mecanografía viñeta escribiendo a máquina]
Según la RAE, la mecanografía es el arte de escribir a máquina. Hace unos
cuantos...
London Excel Meetup Workbooks
-
The workbooks used in my presentation on “Analytical and Interactive
Dashboards in Excel” at the London Excel Meetup, September 3, 2020
International Keyboard Shortcut Day 2019
-
The first Wednesday of every November is International Keyboard Shortcut
Day. This Wednesday, people from all over the world will become far less
efficient...
Welcome, Prashanth!
-
Last March, I shared that we were starting to look for a new CEO for Stack
Overflow. We were looking for that rare combination of someone who… Read
more "W...
Salvador Sostres, analfabeto profesional
-
Los nuevos tiempos traen nuevas profesiones. Internet, además, ha
revolucionado el mundo del periodismo y la palabra escrita. Adaptarse o
morir, ese es el ...
Planificación de compras
-
Realizar una lista con los productos que necesitamos y que formarán parte
de nuestra cesta de la compra nos ayuda a *encontrar la combinación de
bienes p...
Mis metas son seguir superando nuevos retos en Excel y compartirlos en mi blog, para sacarle todo el poder a esta excelente herramienta multiusos, tan usada y a la vez tan incomprendida, para así poder mejorar nuestros conocimientos de Excel.


No Response to "Rolling Calendar Control Tutorial"
Leave A Reply
Comenta este artículo, critícalo o avisa si detectas algún error que haya que corregir.