Traducir el blog

Diseño del Control de Calendario Rodante

Este es el Manual de Diseño del Control de Calendario Rodante que publiqué hace unos días y que puedes descargar desde aquí


Rolling Calendar Control Tutorial

This is the tutorial on the Rolling Calendar Control that I published and that you can download from here

A "friend" told me that this Calendar Control is like a bomb rolling watchmaking. Seeing this image you may be right:


It consists of 7 control groups:

  1. Left side: with 3 buttons to change the control zoom.
  2. Left center: to change the date.
  3. Right center: to change the time.
  4. Right side: with 3 buttons to set the current date and time; for accept changes and to undo changes.
  5. Digits above: to lower the middle pairs of digits.
  6. Digits below: to raise the middle pairs of digits.
  7. Middle digits: clicking on the middle digits toggles between the dates and its format.

These controls can be better placed in this image:


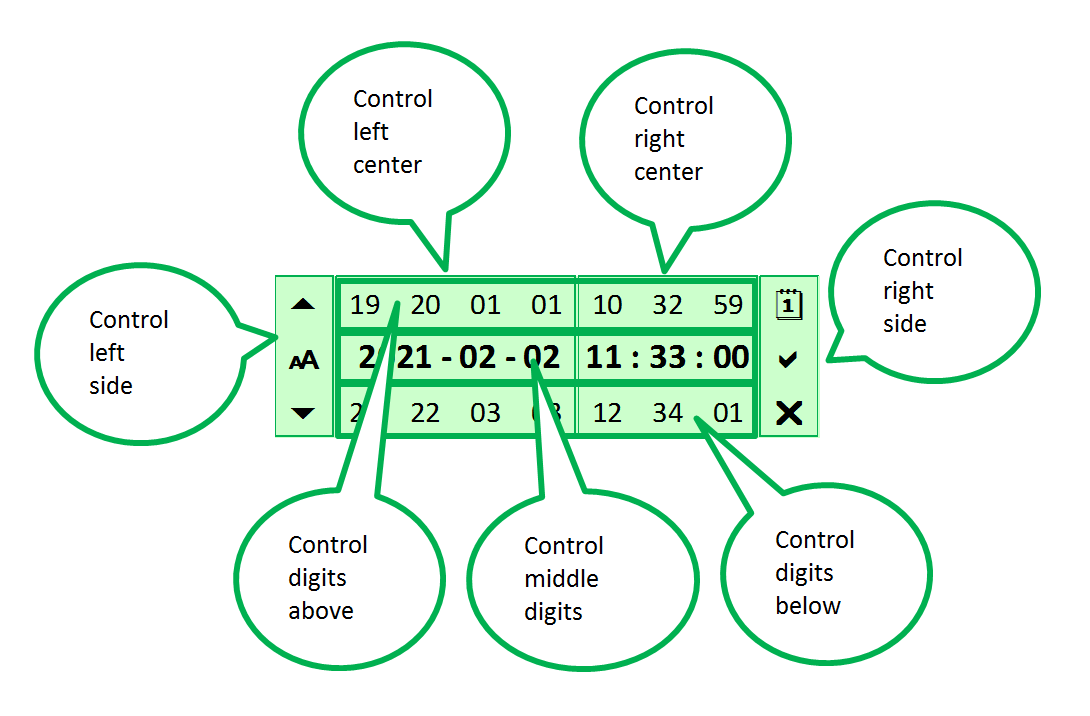
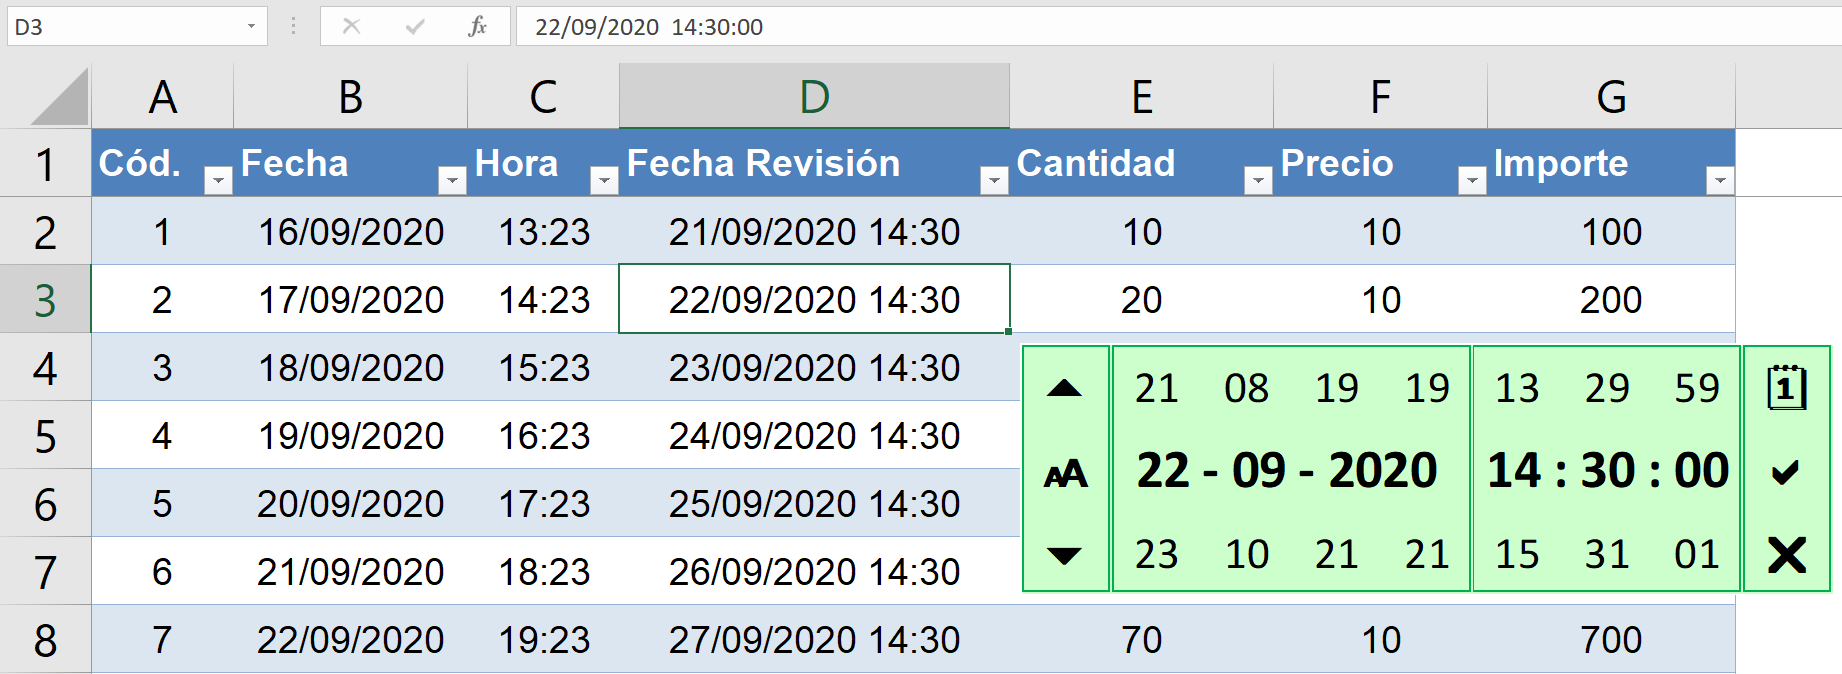
Each pair of digits in the central controls has a pair of digits with the lower value and below another pair of digits with the higher value. By clicking on one of the pairs of digits in the rows upper or lower respectively decreases or increases the torque value of central digits.

BONUS: By placing the cursor on a pair of central digits and moving it to the row higher or lower continuously decreases or increases the value of the associated pairs, as if turning the wheel of that pair of digits, so I have called this "Rolling" Calendar Control.


The three buttons on the left allow you to change the zoom of the control:

Top button: zooms 10% to a maximum of 160%,

Center button: zooms to 100%.
Bottom button: zooms out 10% to a minimum of 80%.


    The three buttons on the right are used to:

    Top button: put the current date and time and update it every second.
    Central button: accept the selected date and time, putting its value in the active cell.
    Bottom button: undo changes and put the value back in control active cell.


      If the sheet is protected and the selected cell is also protected, The Control will be displayed, but when trying to change the value of the cell active, it will not allow to change its value, giving the following warning:

      "The active cell cannot be updated because it is protected."


      Clicking with the right mouse button on the side control left, you enter several menu options:


      We have already discussed the first option that allows you to zoom in on the control with the increase and decrease buttons.

      This option indicates the type of date displayed and can be changed with the increase and decrease buttons. The number format of the active cell it is not modified in any case. The possible date types are:
        • *0 or *1 or *2: Those beginning with an asterisk character (*) indicate which is the regional date format by default, with the separator by system default, so it can be both the "-" character and the "/" character. Its number indicates the same as for the 3 types following.
        • 0 = mm/dd/yyyy being its order: month/day/year
        • 1 = dd-mm-yyyy being its order: day-month-year
        • 2 = yyyy-mm-dd being its order: year-month-day

      The time format is always the same: hh:mm:ss being its order: hours minutes seconds


      This option indicates the rotation speed of the digit pairs change. It can be modified with the increase and decrease buttons. A value s0 makes the Control non-rolling. s8 is the default speed.

      With the values s1 (very slow) to s9 (very fast) the Control is rolling when the mouse cursor is passed from the digits in the middle to the digits above or below.

      This option indicates the type of text font for the control. It can be modified with the increase and decrease buttons. There are 6 fonts:
        • f1 - Calibri
        • f2 - MS Sans Serif
        • f3 - Palatino Linotype
        • f4 - Tahoma
        • f5 - Times New Roman
        • f6 - Verdana

      This option allows you to change the color of the control with the increase and decrease buttons, as can be seen in the following image.


      Clicking with the right mouse button on the right side control, you enter other menu options:


      With this option you access with the browser to the blog post: Rolling Calendar Control.
      This option shows the hidden sheet 'ControlCal' that controls all actions of this Control.
      With this option you access the Copyright page.


      This Calendar Control is displayed if the format of the cells is a type of number with date and/or time format.

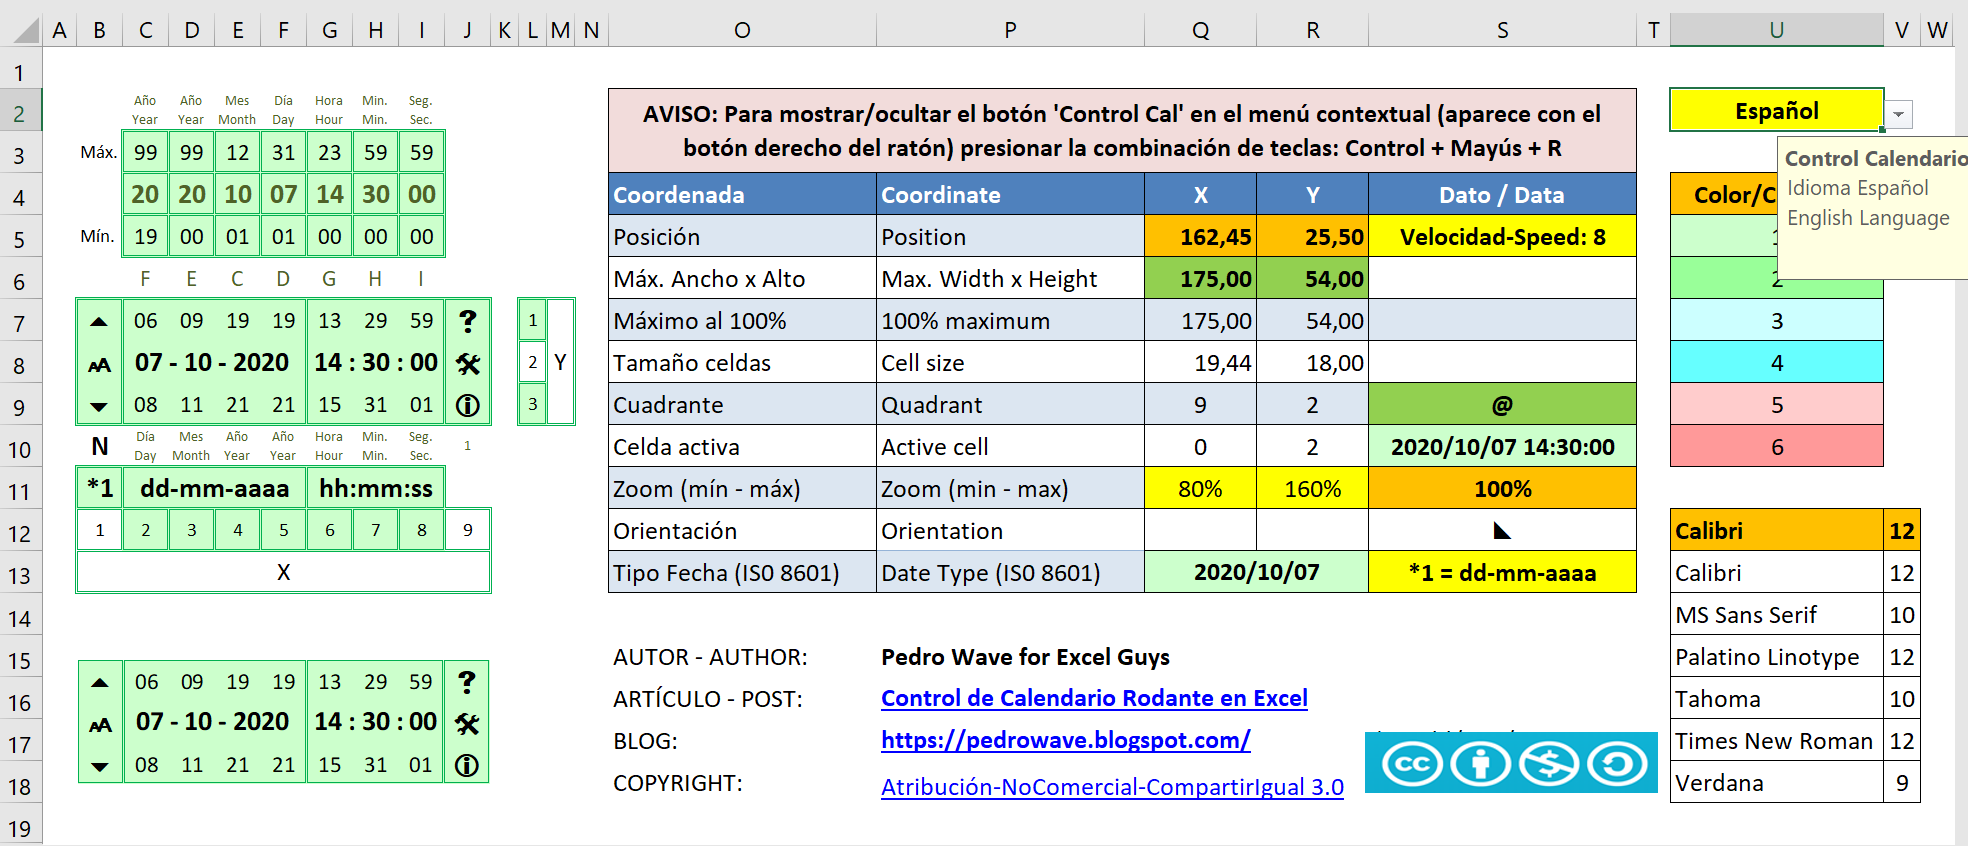
      Examples of cell formats with date and / or time number type:

      • Formats that display the date and time:
        • mm/dd/yyyy hh:mm:ss
        • mm/dd/yyyy hh:mm
        • d mm aa h:m
      • Formats that display the date:
        • mm/dd/yyyy
        • dd-mmm-yy
        • mmm-yy
      • Formats that display the time:
        • [$-F400]h:mm:ss AM/PM
        • hh:mm
        • hh:mm:ss
      • Formats that are not displayed, such as elapsed times:
        • [h]
        • [m]

      If the cell is empty and has a date and/or time format, the control displays the current date and/or time.

      If the cell contains an incorrect date, it reports the error, for example the dates of January and February 1900, which Excel does not calculate well for consider that leap year wrongly:

      "Incorrect date due to being < 1900-03-01"


      In the following video, in Spanish, you can see the new Rolling Calendar Control in action, although most of the explanations in this tutorial are not included in the video, since it is made with the first version of the Control:


      Could comment on anything that is not clear or could be improved.

      If you are looking for a more conventional Calendar Control, go to the one I published here.

      Tutorial del Control de Calendario Rodante

      Este es el tutorial sobre el Control de Calendario Rodante que publiqué hace dos días y que puedes descargar desde aquí

      Un "amigo" me ha dicho que este Control de Calendario es como una bomba de relojería rodante. Viendo esta imagen puede que tenga razón:


      Consta de 7 grupos de control:

      1. Lateral izquierdo: con 3 botones para cambiar el zoom del control.
      2. Central izquierdo: para cambiar la fecha.
      3. Central derecho: para cambiar la hora.
      4. Lateral derecho: con 3 botones para poner la fecha y hora actual; para aceptar cambios y para deshacer cambios.
      5. Cifras de arriba: para hacer descender los pares de cifras de en medio.
      6. Cifras de abajo: para hacer ascender los pares de cifras de en medio.
      7. Cifras de en medio: haciendo clic en las cifras centrales se conmuta entre las fechas y su formato.

      Estos controles se pueden situar mejor en esta imagen:

      En los controles centrales cada par de cifras tiene encima un par de cifras con el valor inferior y debajo otro par de cifras con el valor superior. Haciendo clic en uno de los pares de cifras de las filas superior o inferior disminuye o aumenta respectivamente el valor del par de cifras centrales.

      BONUS: Situando el cursor en un par de cifras centrales y moviéndolo a la fila superior o inferior disminuye o aumenta continuamente el valor de los pares asociados, como si girara la rueda de ese par de cifras, por lo que he denominado "Rodante" a este Control de Calendario.


      Los tres botones de la izquierda permiten cambiar el zoom del control:

      Botón superior: aumenta el zoom un 10% hasta un máximo del 160%,

      Botón central: pone el zoom al 100%.
      Botón inferior: disminuye el zoom un 10% hasta un mímino del 80%.


        Los tres botones de la derecha sirven para:

        Botón superior: poner la fecha y hora actual y actualizarla cada segundo.
        Botón central: aceptar la fecha y hora seleccionadas, poniendo su valor en la celda activa.
        Botón inferior: deshacer los cambios y volver a poner en el control el valor de la celda activa.


          Si la hoja está protegida y la celda seleccionada también está protegida, se visualizará el Control pero, al intentar cambiar el valor de la celda activa, no permitirá cambiar su valor, dando el siguiente aviso:


          Haciendo clic con el botón derecho del ratón sobre el control lateral izquierdo, se entra en varias opciones de menú:


          Ya hemos comentado la primera opción que permite hacer zoom sobre el control con los botones de aumento y disminución.

          Esta opción indica el tipo de fecha que se muestra y se puede cambiar con los botones de aumento y disminución. El formato numérico de la celda activa no se modifica en ningún caso. Los tipos de fecha posibles son:
            • *0 o *1 o *2: Los que comienzan por un carácter asterisco (*) indican que es el formato regional de fecha por defecto, con el separador por defecto del sistema, por lo que puede ser tanto el carácter "-" como el carácter "/". Su número indica lo mismo que para los 3 tipos siguientes.
            • 0 = mm/dd/yyyy siendo su orden: mes/día/año
            • 1 = dd-mm-yyyy siendo su orden: día-mes-año
            • 2 = yyyy-mm-dd siendo su orden: año-mes-día

          El formato de horas siempre es el mismo: hh:mm:ss siendo su orden: horas:minutos:segundos


          Esta opción indica la velocidad de rotación del cambio de pares de cifras. Se puede modificar con los botones de aumento y disminución. Un valor s0 hace que el Control no sea rodante.

          Con los valores s1 (muy despacio) a s9 (muy deprisa) el Control es rodante cuando se pasa el cursor del ratón desde las cifras de en medio a las cifras de arriba o de abajo.

          Esta opción indica el tipo de fuente de texto de las cifras del control: Se puede modificar con los botones de aumento y disminución. Son 6 fuentes:
            • f1 - Calibri
            • f2 - MS Sans Serif
            • f3 - Palatino Linotype
            • f4 - Tahoma
            • f5 - Times New Roman
            • f6 - Verdana

          Esta opción permite cambiar el color del control con los botones de aumento y disminución, como se puede ver en la siguiente imagen.


          Haciendo clic con el botón derecho del ratón sobre el control lateral derecho, se entra en otras opciones de menú:


          Con esta opción se accede con el navegador al artículo del blog con el Control de Calendario Rodante.
          Con esta opción se muestra la hoja oculta 'ControlCal' que controla todas las acciones de este Control.
          Con esta opción se accede a la página de Copyright.


          Este Control de Calendario se visualiza si el formato de las celdas es un tipo de número con formato de fecha y/o hora.

          En la siguiente imagen se muestran varios formatos válidos:


          Ejemplos de formatos de celda con tipo de número de fecha y/o hora:

          • Formatos que visualizan la fecha y la hora:
            • dd-mm-aaaa hh:mm:ss
            • dd-mm-aaaa hh:mm
            • d mm aa h:m
          • Formatos que visualizan la fecha:
            • dd-mm-aaaa
            • dd-mmm-aa
            • mmm-aa
          • Formatos que visualizan la hora:
            • [$-F400]h:mm:ss AM/PM
            • hh:mm
            • hh:mm:ss
          • Formatos que no se visualizan, como los tiempos transcurridos:
            • [h]
            • [m]

          Si la celda está vacía y tiene formato de fecha y/o hora, el control visualiza la fecha y/o hora actual.

          Si la celda contiene una fecha incorrecta, avisa del error, por ejemplo las fechas de enero y febrero de 1900, que Excel no calcula bien por considerar ese año bisiesto erróneamente:


          En el siguiente vídeo se puede ver el nuevo Control de Calendario en acción, aunque la mayoría de las explicaciones de este tutorial no están incluidas en el vídeo, ya que está hecho con la primera versión del Control:


          Comenta cualquier cosa que no esté clara o que se pueda mejorar.

          Si buscas un Control de Calendario más convencional accede al que publiqué aquí.

          Rolling Calendar Control in Excel

          Control de Calendario Rodante en Excel

          Enlace a este artículo en Español


          New Calendar Control with dates and times

          Usually the calendar controls only allow changing the date, showing it within a monthly calendar, like the one I published 6 years ago and that you can analyze in the following link:

          Drop-Down Calendar Control


          Now I have decided to create a new Rolling Calendar control with dates and times in Excel hat allows modifying both dates and times, and for this I have designed a shape in Excel, that I have named ControlCal, and that shows both the date and the time in 7 pairs of digits with: the day; the month; the thousands and hundreds of the year; the tens and units of the year; the hours; minutes and seconds, which can be seen in this image:


          This Calendar Control consists of 4 groups:

          1. Left side with 3 buttons to change the zoom of the Control, in main mode.
          2. Left center to change the date.
          3. Right center to change the time.
          4. Right side with 3 buttons to set the current date and time; for accept changes and to undo changes, in default mode.

          Right-clicking on the side buttons more options are shown, which I will explain in a tutorial of this Contol of Calendar in the next article of this blog.


          Video with the new Calendar Control

          It is a rolling Calendar Control because one of its main features is that the figures roll or rotate up or down to change its value.

          In the following video, made with the first version of the Control, you can see the new Calendar Control in action:


          ATTENTION: This Control Calendar create a 'ControlCal' sheet in each book that is enabled to display it, in which the Control data is updated, and which is displayed by a shape created with the Excel Camera (watch usage example here) on each sheet that the Control will use.

          This is the sheet that serves as the basis to make this Control of Calendar:


          This sheet will be explained in a future tutorial on this blog.

          Cells with date and time formats

          To display this Calendar Control, the format of the cells must be of a number type with date and / or time format. In the next image shows several valid formats:


          In the next article of this blog I will give more details about the formats of valid cell numbers for this Calendar Control.

          Calendar Control Download

          Download this new Calendar Control from Google (with the button "Excel Download") or from the link to Microsoft OneDrive:


          Opens the file, allows editing, and enables the content and macros to test this unique Calendar Control, which I have dared to design when not finding any similar on the Internet.

          If you know of someone who has published a similar Calendar Control in Excel, please! I would like to know!


          Copyright

          I am publishing under a Creative Commons License

          Attribution-NonCommercial-ShareAlike 3.0 Unported (CC BY-NC-SA 3.0)

          The license terms are:

          • Attribution: Give appropriate credit, especially keep my name and my blog name in the workbook and the code.
          • Share the same : Give it away for free. I'm giving it away for free as well which also has to do the same.
          • Noncommercial : Don't use my template and code to create a template or workbook for business sale.


          Calendar Control Add-In

          To use this Calendar Control in all your templates, you must install it as an Excel add-in.

          This page explains how to add or remove add-ins from Excel:

          Add or remove add-ins in Excel


          To install the downloaded file as a add-in:

          1. Open the downloaded file
          2. In the menu select: Archive
          3. Save as
          4. This PC (See image below)
          5. Select from the dropdown: Excel Add-in (.xlam). (See image below)
          6. Click the button: Save
          7. Close the downloaded file


          To activate the add-in:

          1. Open Excel
          2. Open a new workbook
          3. In the menu select: File
          4. More...
          5. Options
          6. Add-Ins
          7. Under Manage, select: Excel Add-ins
          8. Click on the button: Go...
          9. Check the new add-in: Control Calendario Rodante
          10. Click the button: OK


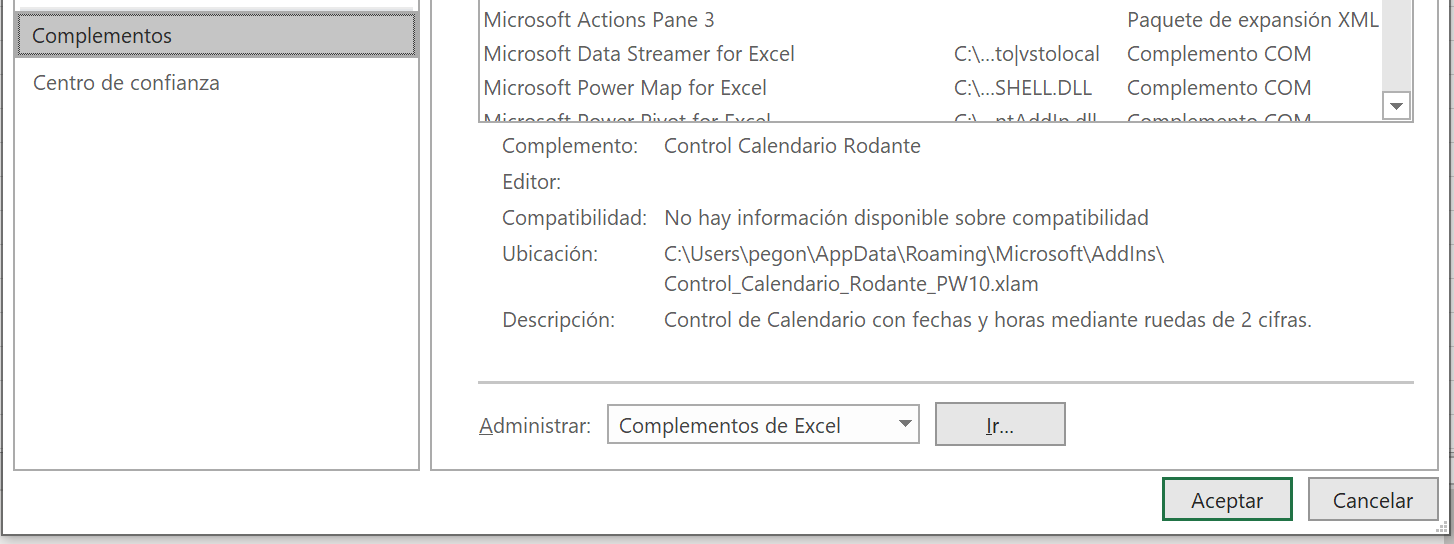
          This is how the new add-in available should be checked: Control Calendario Rodante


          To display the new Calendar Control:

          1. Write a date in a cell
          2. Show the context menu with the right mouse button
          3. If the button above is not Control Cal, select another cell and press this 3 keys at the same time: Control + Shift + R
          4. Show context menu with right mouse button
          5. Click on the button above: Control Cal
          6. The question appears: Do you want to create the Control?
          7. Click the button: Yes

          The first icon in the context menu is the Control Cal, as shown see in this image:


          Tutorial for the use and design of this Control

          In two next articles I will give a tutorial with the instructions for use and how this new Rolling Calendar Control was designed with dates and hours, to which I have devoted many hours of development.

          I hope that the use of this Control is a comfortable, useful and innovative way to enter dates and times in Excel cells, for which I have Tried to make it compatible with all versions of Excel, from Excel 2010 through Excel 365, both in 32-bit and 64-bit versions.

          If you find it interesting, give it a try and give me suggestions and comments for be able to debug it and improve it in future versions.

          Mi lista de blogs